

In this part I am going to demonstrate:
- Running Jenkins on Docker
- Automation of Jenkins plugin installation on Docker
- Configuring java and maven tools on Jenkins, first manually and then via the groovy scripts
- Automating the above step with Docker
- Running Sonarqube on Docker
- Setting up java maven pipeline with unit test, test coverage and sonarqube analysis steps.
Next time, in part 2(WIP), I am going to demonstrate everything you need for deployment:
- How to run Artifactory repository on Docker
- How to configure POM file for deployment
- How to configure maven settings for deployment
- Using maven deployment plugin
- Setting up, configuring and Dockerizing couple Jenkins plugins for keeping deployment credentials in safe place, apply maven setting file in the job
This is a practical example, so be ready to get your hands dirty. You can either follow this step by step guide, which would be really good for learning purposes and we will create everything from the scratch, or if you are lazy, just run the command bellow after reading for the demo:
git clone https://github.com/kenych/jenkins_docker_pipeline_tutorial1 && cd jenkins_docker_pipeline_tutorial1 && ./runall.sh

but by the end you should be able to run the pipeline on fully automated Jenkins Docker container.
As you may already know, with Jenkins 2 you can actually have your build pipeline right within your java project. So you can actually use your own maven java project in order to follow the steps in this article as long as it is hosted on a git repository.
Everything obviously will be running on Docker as it is the easiest way of deploying and running them.
So, let’s see how to run Jenkins on Docker
docker pull jenkins:2.60.1
While it is downloading in the background let’s see what we are going to do with it once it is done.
Default Jenkins comes quite naked and shows suggested plugins installation wizard. We will choose it, then we will capture all installed plugins and then automate this manual step in Docker image and will follow this simple rule throughout the all steps:
- manually setup
- programmatically
- automate with Docker
The image we are going to download is 600M so you can prepare yourself coffee and have couple sips before it is finished and I will take you through the steps we need to setup up build pipeline for java project. Let’s add them to the list and then look closer later:
- Pull the code from scm
- Configuration of java and maven
- Running unit tests
- Running static analysis
- Sending report to Sonarqube for further processing
- And finally deployment of the jar file to repository(will be covered in the next part soon)
- Optionally we can also release it after each commit.
Once you have your image downloaded let’s run the container:
docker run -p 8080:8080 --rm --name myjenkins jenkins:2.60.1
Please note I used a specific tag, I am not using latest tag, which is the default if you don’t specify one, as I don’t want anything to break in the future.
Also note we name the container so it is easier to refer to it later as otherwise docker will name it randomly and we added –-rm flag to delete container once we stop it, this will ensure we are running Jenkins in an immutable fashion and everything configured on the fly, and if we want to preserve any data we will do it explicitly.
Port 8080 is busy?
If you get error that port 8080 is busy just choose the one which is free for the first part of 8080:8080. The first one is host port and second one is the port where Jenkins will run inside container. Let’s open localhost:8080 (or whatever you have chosen as host port). You should see the screenshot below for putting admin password:

Grab it from from the docker logs and paste there.

You should be seeing plugin installation wizard now.
Choose suggested plugins option and Jenkins will start installation of plugins. Once done we need to capture the plugins installed and then automate it in Docker.
Open http://localhost:8080/script and paste this groovy script and run:
Jenkins.instance.pluginManager.plugins.each{
  plugin ->
    println ("${plugin.getShortName()}")
}
 Now, copy plugins that displayed in the list, that is all text from top until “Result:” section and create a file plugins.txt and paste copied text there.
There are two alternative ways of getting the installed plugins:
Thanks to https://stackoverflow.com/questions/9815273/how-to-get-a-list-of-installed-jenkins-plugins-with-name-and-version-pair
curl "http://192.168.1.7:8080/pluginManager/api/json?depth=1" | jq -r '.plugins[].shortName'
Or even more extreme way which I came up with, from the container:
docker exec -it myjenkins ls /var/jenkins_home/plugins/ | grep -v jpi
You can also use cli, first download it from http://localhost:8080/jnlpJars/jenkins-cli.jar, then run:
java -jar jenkins-cli.jar -s http://localhost:8080/ list-plugins
But I have deliberately chosen groovy script version as you will need this script running window thing quite a lot to test different scripts that we will use to configure Jenkins programmatically.
Let’s stop the container and automate this step:
docker stop myjenkins
or simply press CTRL + C.
Let’s start dockerizing the Jenkins plugin installation part now by creating an empty file called Dockerfile and adding couple lines to it:
#this is the base image we use to create our image from
FROM jenkins:2.60.1

#just info about who created this
MAINTAINER Kayan Azimov (email)

#get rid of admin password setup
ENV JAVA_OPTS="-Djenkins.install.runSetupWizard=false"

#automatically installing all plugins
COPY plugins.txt /usr/share/jenkins/ref/plugins.txt
RUN /usr/local/bin/install-plugins.sh < /usr/share/jenkins/ref/plugins.txt
Please make sure you have empty new line in the end of plugins.txt file, as otherwise Jenkins will complain during installation of the plugins. Time to build our image:
docker build -t myjenkins .
Pay attention to the dot in the end, don’t miss it. It is going to take a while as now jenkins image has instructions to download and install the plugins we defined in plugins.txt. Once it is ready we can run it:
docker run -p 8080:8080 --rm --name myjenkins myjenkins:latest
Please note that this time we are running container not from default image but the one we have just baked. You can check installed plugins by running the same script we did or just in the UI:

Tool Installation
So far it is good and the first stage is completed. Now time for java and maven tool installation. Jenkins has an ability to configure any tool on the fly when it is required. It is sort of old style docker 😊 Given jenkins had been designed a decade ago this is actually quite a cool feature, but I think in the future it won’t be continued as more and more tools are being available as docker containers. You can read more about tool here: https://wiki.jenkins.io/display/JENKINS/Tool+Auto-Installation
Let’s start with java, even though we actually running jenkins on java, meaning we must have java installed, we aren’t going to use it, instead we should be able to run our project with any version of java. But firstly we need to have all tools needed in hands. Let’s download couple versions of java. I found place where you can find any versions of JDK if it doesn’t work you can Google it.
curl -O http://ftp.osuosl.org/pub/funtoo/distfiles/oracle-java/jdk-8u131-linux-x64.tar.gz
curl -O http://ftp.osuosl.org/pub/funtoo/distfiles/oracle-java/jdk-7u76-linux-x64.tar.gz
And then download maven:
curl -O http://apache.mirror.anlx.net/maven/maven-3/3.5.0/binaries/apache-maven-3.5.0-bin.tar.gz
Create downloads folder and copy them there. Your downloads directory should look like this now:
➜ my_jenkins tree downloads
downloads
├── apache-maven-3.5.0-bin.tar.gz
├── jdk-7u76-linux-x64.tar.gz
└── jdk-8u131-linux-x64.tar.gz

0 directories, 3 files
➜ my_jenkins
Once done we are ready to run container again, this time I mounted a host directory “downloads” as a volume inside of container, so it can access the files in the host folder in order to download maven and java later:
docker run -p 8080:8080 -v `pwd`/downloads:/var/jenkins_home/downloads --rm --name myjenkins myjenkins:latest
Let’s make sure we can see the contents of the folder from within container:
➜  ~ docker exec -it myjenkins ls -l /var/jenkins_home/downloads

total 328444
-rw-r--r-- 1 jenkins jenkins   8534562 Jul  4 22:29 apache-maven-3.5.0-bin.tar.gz
-rw-r--r-- 1 jenkins jenkins 142249690 Jul  4 23:08 jdk-7u76-linux-x64.tar.gz
-rw-r--r-- 1 jenkins jenkins 185540433 Jul  4 21:35 jdk-8u131-linux-x64.tar.gz
➜  ~
We are now ready to install the tools, so go to url http://localhost:8080/configureTools/ by choosing Manage Jenkins -> Global Tool Configuration.
In the JDK section delete Oracle Installer, we won’t use that, it requires oracle account (why in the earth you need an account to download the bloody java!)


You need to specify the name, URL and folder name. Setup as in the screenshot, the URL will be used to download the binary and folder to refer to unzipped package so having them correctly set up is crucial. Let’s setup java 7 and 8 as well.

Then maven:

Now we can check if our tools are configured correctly inside Jenkins. So let’s create a job and set up it’s type to pipeline and start writing our code:

pipeline {
    agent any
    tools {
        jdk 'jdk7'
        maven 'maven3'
    }
    stages {
        stage('test java installation') {
            steps {
                sh 'java -version'
                sh 'which java'
            }
        }
        stage('test maven installation') {
            steps {
                sh 'mvn -version'
                sh 'which mvn'
            }
        }
    }
}
It was a tedious process, wasn’t it, the tool installation. Imagine if you had dozen of tools in Jenkins, that is how normal Jenkins will look like in any real production system:
- Couple versions of java
- Couple versions of nodejs
- Maven
- Sonar, to name a few
But once we automate this process, we can just run it and relax. Now that you have everything hopefully working it is time to automate tool installation. You can delete the tools you have added and recreate them via the script.
Go to script section and copy and run this scripts one by one which installs everything we did earlier programmatically:
import hudson.model.JDK
import hudson.tools.InstallSourceProperty
import hudson.tools.ZipExtractionInstaller

def descriptor = new JDK.DescriptorImpl();


def List<JDK> installations = []

javaTools=[['name':'jdk8', 'url':'file:/var/jenkins_home/downloads/jdk-8u131-linux-x64.tar.gz', 'subdir':'jdk1.8.0_131'],
      ['name':'jdk7', 'url':'file:/var/jenkins_home/downloads/jdk-7u76-linux-x64.tar.gz', 'subdir':'jdk1.7.0_76']]

javaTools.each { javaTool ->

    println("Setting up tool: ${javaTool.name}")

    def installer = new ZipExtractionInstaller(javaTool.label as String, javaTool.url as String, javaTool.subdir as String);
    def jdk = new JDK(javaTool.name as String, null, [new InstallSourceProperty([installer])])
    installations.add(jdk)

}
descriptor.setInstallations(installations.toArray(new JDK[installations.size()]))
descriptor.save()
And Maven:
import hudson.tasks.Maven
import hudson.tasks.Maven.MavenInstallation;
import hudson.tools.InstallSourceProperty;
import hudson.tools.ToolProperty;
import hudson.tools.ToolPropertyDescriptor
import hudson.tools.ZipExtractionInstaller;
import hudson.util.DescribableList
import jenkins.model.Jenkins;

def extensions = Jenkins.instance.getExtensionList(Maven.DescriptorImpl.class)[0]

List<MavenInstallation> installations = []

mavenToool = ['name': 'maven3', 'url': 'file:/var/jenkins_home/downloads/apache-maven-3.5.0-bin.tar.gz', 'subdir': 'apache-maven-3.5.0']

println("Setting up tool: ${mavenToool.name} ")

def describableList = new DescribableList<ToolProperty<?>, ToolPropertyDescriptor>()
def installer = new ZipExtractionInstaller(mavenToool.label as String, mavenToool.url as String, mavenToool.subdir as String);

describableList.add(new InstallSourceProperty([installer]))

installations.add(new MavenInstallation(mavenToool.name as String, "", describableList))

extensions.setInstallations(installations.toArray(new MavenInstallation[installations.size()]))
extensions.save()
Check tools, everything we created earlier is there again. Yay!
Let’s test it and make sure it is actually working by creating and running same test pipeline. Oh, snap! It is gone of course, as we delete the container when we stop it.
So let’s make sure next time we destroy container jobs aren’t lost. Stop the container, again, create directory jobs in current directory and run it with next command:
docker run -p 8080:8080 -v `pwd`/downloads:/var/jenkins_home/downloads -v `pwd`/jobs:/var/jenkins_home/jobs/ --rm --name myjenkins myjenkins:latest
Now we saving all jobs in jobs directory on the host, so next time you destroy container it will be there when we run it again.
Let’s dockersize the automation now. Create groovy files and put them to groovy folder in the project.

Your Dockerfile should look like below:
#this is the base image we use to create our image from
FROM jenkins:2.60.1

#just info about who created this
MAINTAINER Kayan Azimov (email)

#get rid of admin password setup
ENV JAVA_OPTS="-Djenkins.install.runSetupWizard=false"

#automatically installing all plugins
COPY plugins.txt /usr/share/jenkins/ref/plugins.txt
RUN /usr/local/bin/install-plugins.sh < /usr/share/jenkins/ref/plugins.txt

#adding scripts
COPY groovy/* /usr/share/jenkins/ref/init.groovy.d/
We did this because when Jenkins starts it runs all scripts in a directory called init.groovy.
We are now ready to build a new image and run it:
➜  my_jenkins   docker build -t myjenkins .

Sending build context to Docker daemon  336.7MB
Step 1/6 : FROM jenkins:2.60.1
 ---> 0b4d4d677a26
Step 2/6 : MAINTAINER Kayan Azimov
 ---> Using cache
 ---> 67b933684219
Step 3/6 : ENV JAVA_OPTS "-Djenkins.install.runSetupWizard=false"
 ---> Using cache
 ---> 058a419179cb
Step 4/6 : COPY plugins.txt /usr/share/jenkins/ref/plugins.txt
 ---> Using cache
 ---> 98b3e9b27bdc
Step 5/6 : RUN /usr/local/bin/install-plugins.sh < /usr/share/jenkins/ref/plugins.txt ---> Using cache
 ---> 1d10702cc94a
Step 6/6 : COPY groovy/* /usr/share/jenkins/ref/init.groovy.d/
 ---> c81d7db388c9
Removing intermediate container 83ee1aa76a22
Successfully built c81d7db388c9
Successfully tagged myjenkins:latest
➜  my_jenkins
And then run container:
➜ my_jenkins docker run -p 8080:8080 -v `pwd`/downloads:/var/jenkins_home/downloads -v `pwd`/jobs:/var/jenkins_home/jobs/ --rm --name myjenkins myjenkins:latest
You should see installation happening in the logs:
Jul 05, 2017 8:27:50 PM jenkins.util.groovy.GroovyHookScript execute
INFO: Executing /var/jenkins_home/init.groovy.d/java.groovy
Jul 05, 2017 8:27:50 PM hudson.model.AsyncPeriodicWork$1 run
INFO: Started Download metadata
Setting up tool: jdk8
Setting up tool: jdk7
Jul 05, 2017 8:27:50 PM jenkins.util.groovy.GroovyHookScript execute
INFO: Executing /var/jenkins_home/init.groovy.d/maven.groovy
Setting up tool: maven3
Jul 05, 2017 8:27:51 PM jenkins.util.groovy.GroovyHookScript execute
INFO: Executing /var/jenkins_home/init.groovy.d/tcp-slave-agent-port.g
Check the test pipeline, it should be there this time and run it.
If all good and our test pipeline is working, it is a time to create pipeline for our java maven project.
Create a new pipeline job, but this time select Pipeline script from SCM and specify the path to your git maven project.
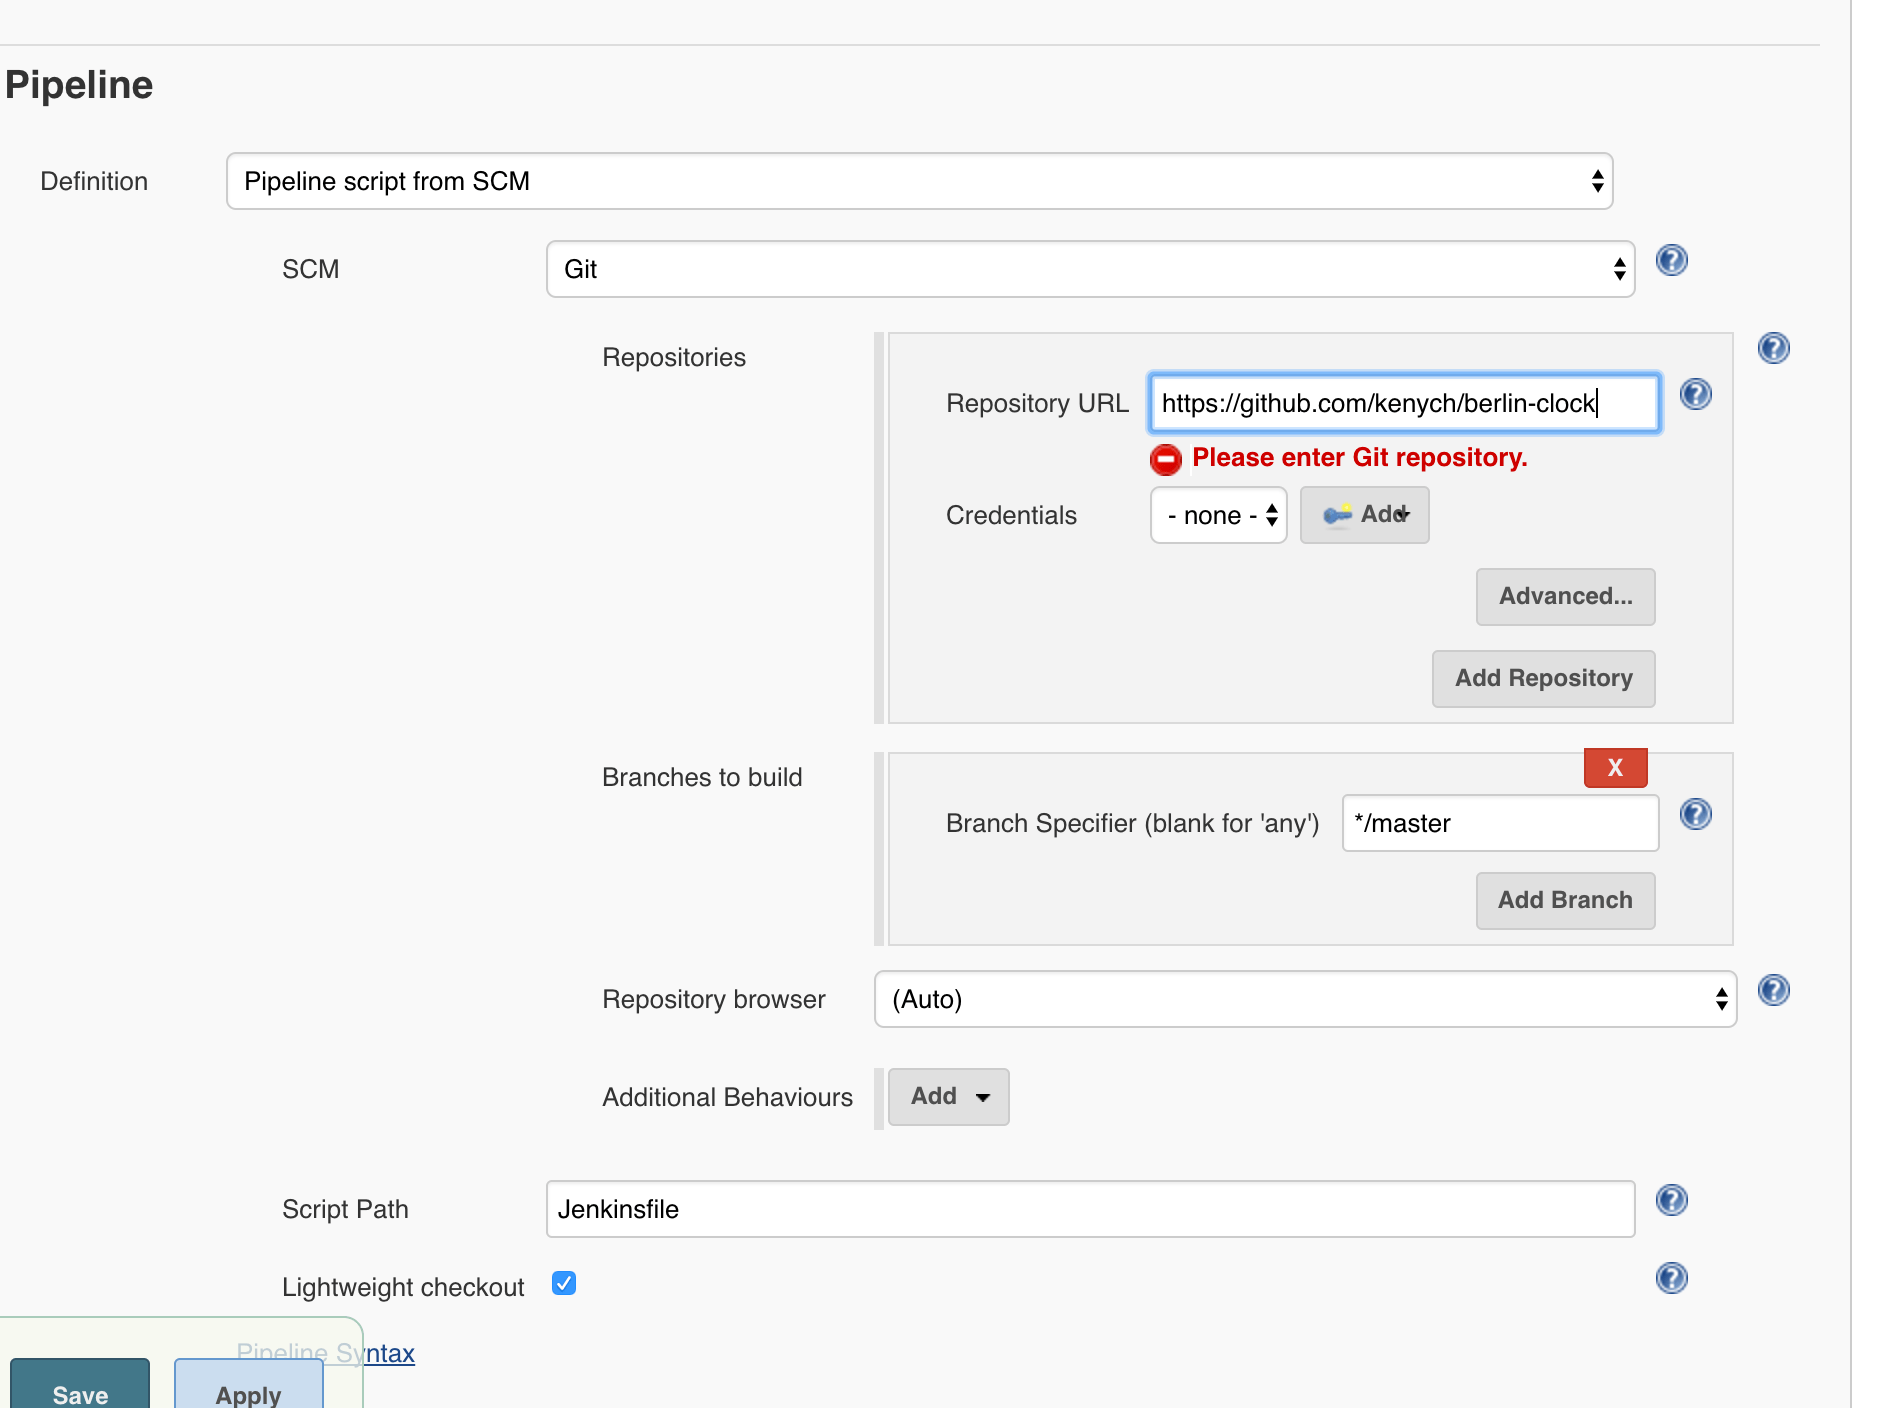
If you don’t have one you can use the one in this example or if you don’t want to commit changes every time we test pipeline you can always update it right in Jenkins instead of pushing new Jenkins file, by just clicking arrow next to the last job and selecting Replay and updating the script:

Otherwise create a file called Jenkins in your git project with the content as below, push your changes, and run the build:
pipeline {
    agent any

    tools {
        jdk 'jdk8'
        maven 'maven3'
    }

    stages {
        stage('Install') {
            steps {
                sh "mvn clean test"
            }
        }
    }
}
You just have ran first step successfully. Great, let’s move forward and publish test results:
pipeline {
    agent any

    tools {
        jdk 'jdk8'
        maven 'maven3'
    }

    stages {
        stage('Install') {
            steps {
                sh "mvn clean test"
            }
            post {
                always {
                    junit '**/target/*-reports/TEST-*.xml'
                }
            }
        }
    }
}

And now add test coverage with maven cobertura plugin:
pipeline {
    agent any

    tools {
        jdk 'jdk8'
        maven 'maven3'
    }

    stages {
        stage('Install') {
            steps {
                sh "mvn -U clean test cobertura:cobertura -Dcobertura.report.format=xml"
            }
            post {
                always {
                    junit '**/target/*-reports/TEST-*.xml'
                }
            }
        }
    }
}
In the job logs you should see this now:
	at net.sourceforge.cobertura.reporting.xml.XMLReportFormatStrategy.save(XMLReportFormatStrategy.java:18)
	at net.sourceforge.cobertura.reporting.NativeReport.export(NativeReport.java:31)
	at net.sourceforge.cobertura.reporting.CompositeReport.export(CompositeReport.java:19)
	at net.sourceforge.cobertura.reporting.ReportMain.parseArgumentsAndReport(ReportMain.java:91)
	at net.sourceforge.cobertura.reporting.ReportMain.generateReport(ReportMain.java:141)
	at net.sourceforge.cobertura.reporting.ReportMain.main(ReportMain.java:151)

[INFO] Cobertura Report generation was successful.
[INFO] ------------------------------------------------------------------------
[INFO] BUILD SUCCESS
If you check the build logs, ignore some cobertura issues if running java 8 project, as cobertura doesn’t support java 8, I will probably update it to use jacoco in the next session.
In order to see cobertura results on Jenkins page you need the plugin, let’s first install manually by going to http://localhost:8080/pluginManager/advanced
Then download hpi file from http://updates.jenkins-ci.org/latest/cobertura.hpi and click on upload plugin.
You can now stop the container, add cobertura to the list in the plugins.txt and rebuild the image, but don’t run it yet!
The point is, there is something else which could make our builds faster after container is destroyed. If you have noticed, every time we destroy the container and run it again after new image is built, job takes ages for the very first time and you can see these logs:
Downloaded: https://repo.maven.apache.org/maven2/org/apache/maven/plugins/maven-compiler-plugin/3.1/maven-compiler-plugin-3.1.pom (10 kB at 16 kB/s)


Downloading: https://repo.maven.apache.org/maven2/org/apache/maven/plugins/maven-plugins/24/maven-plugins-24.pom
Progress (1): 2.1/11 kB
Progress (1): 4.9/11 kB
Progress (1): 7.7/11 kB
Progress (1): 10/11 kB
Progress (1): 11 kB

Downloaded: https://repo.maven.apache.org/maven2/org/apache/maven/plugins/maven-plugins/24/maven-plugins-24.pom (11 kB at 68 kB/s)
Downloading: https://repo.maven.apache.org/maven2/org/apache/maven/maven-parent/23/maven-parent-23.pom
Progress (1): 2.1/33 kB
Progress (1): 4.9/33 kB
Progress (1): 7.7/33 kB
Progress (1): 10/33 kB
Progress (1): 13/33 kB
Progress (1): 16/33 kB
Progress (1): 19/33 kB
Progress (1): 21/33 kB
Progress (1): 24/33 kB
Progress (1): 27/33 kB
Progress (1): 30/33 kB
Progress (1): 32/33 kB
Progress (1): 33 kB
That is because maven resolves project dependencies and saves them to var/jenkins_home/.m2/repository and if you run job again, it won’t download them again, thing is, it is lost when container is destroyed. So let’s add them via volume just like we did for jobs, to do so, just run container with below command:
mkdir m2deps
docker run -p 8080:8080  -v `pwd`/downloads:/var/jenkins_home/downloads -v `pwd`/jobs:/var/jenkins_home/jobs/ -v `pwd`/m2deps:/var/jenkins_home/.m2/repository/ --rm --name myjenkins myjenkins:latest
Container is now downloading the cobertura plugin:


Ignore this error in the logs, it as despite this exception, plugin still works, just some unresolved issue 🙂 We can now add cobertura publisher to the pipeline:
pipeline {
    agent any

    tools {
        jdk 'jdk8'
        maven 'maven3'
    }

    stages {
        stage('Install') {
            steps {
                sh "mvn -U clean test cobertura:cobertura -Dcobertura.report.format=xml"
            }
            post {
                always {
                    junit '**/target/*-reports/TEST-*.xml'
                    step([$class: 'CoberturaPublisher', coberturaReportFile: 'target/site/cobertura/coverage.xml'])
                }
            }
        }
    }
}
If you run the job now you should get this nice reports:

Now time for Sonarqube analysis. We are going to use maven sonar plugin, I am not going to explain here what is sonarqube, but in short, it keeps the track of code quality issues, you can read here https://www.sonarqube.org/features/clean-code/
So pull and then run the container:
docker pull sonarqube:6.3.1
Another big image, around 700M, so time for some break.. And once done run it:
docker run -p 9000:9000 --rm --name mysonar sonarqube:6.3.1
open http://localhost:9000 and login as admin:admin and check what is there if you are curious, otherwise stop your Jenkins container and run it again with Sonar host, you will need to use host’s ip address and not localhost as that will point to docker container’s localhost, so easiest way to find your ip (on Mac)
~ ifconfig | grep "inet " | grep -v 127.0.0.1

	inet 192.168.1.7 netmask 0xffffff00 broadcast 192.168.1.255
➜  ~
Now run Jenkins container with environment variable set:
docker run -p 8080:8080 -v `pwd`/downloads:/var/jenkins_home/downloads -v `pwd`/jobs:/var/jenkins_home/jobs/ -v `pwd`/m2deps:/var/jenkins_home/.m2/repository/ --rm --name myjenkins -e SONARQUBE_HOST=http://192.168.1.7:9000 myjenkins:latest
Once Jenkins is up, update the pipeline with sonar stage:
pipeline {
    agent any

    tools {
        jdk 'jdk8'
        maven 'maven3'
    }

    stages {
        stage('Install') {
            steps {
                sh "mvn -U clean test cobertura:cobertura -Dcobertura.report.format=xml"
            }
            post {
                always {
                    junit '**/target/*-reports/TEST-*.xml'
                    step([$class: 'CoberturaPublisher', coberturaReportFile: 'target/site/cobertura/coverage.xml'])
                }
            }
        }
        stage('Sonar') {
            steps {
                sh "mvn sonar:sonar -Dsonar.host.url=${env.SONARQUBE_HOST}"
            }
        }

    }
}
Job logs will look like this:
[INFO] Sensor CPD Block Indexer (done) | time=82ms
[INFO] SCM provider for this project is: git
[INFO] 33 files to be analyzed


[INFO] 33/33 files analyzed
[INFO] Calculating CPD for 4 files
[INFO] CPD calculation finished


[INFO] Analysis report generated in 1781ms, dir size=88 KB


[INFO] Analysis reports compressed in 8120ms, zip size=72 KB


[INFO] Analysis report uploaded in 794ms
[INFO] ANALYSIS SUCCESSFUL, you can browse http://192.168.1.7:9000/dashboard/index/ken:berlin-clock
[INFO] Note that you will be able to access the updated dashboard once the server has processed the submitted analysis report
[INFO] More about the report processing at http://192.168.1.7:9000/api/ce/task?id=AV0Zqa6f3jKwEhMXqqnG
[INFO] Task total time: 26.487 s
[INFO] ------------------------------------------------------------------------
Once you run it, lets go and check the report on the sonarqube side.
http://192.168.1.7:9000/dashboard/index/ken:berlin-clock
OMG! My code has 23 code smells, if you fix one of the smelly issues and rerun the job, check the report, you should see sonar will detect the fix with committer information.

Finally our pipeline is ready:

We can do a subtle improvement here. Sonarqube uses source code only, meaning we can run maven install and sonar in a parallel stages, unfortunately this is not yet implemented, but should be resolved in this story, but we can still use parallel steps, so let’s do it:
pipeline {
    agent any

    tools {
        jdk 'jdk8'
        maven 'maven3'
    }

    stages {
        stage('install and sonar parallel') {
            steps {
                parallel(install: {
                    sh "mvn -U clean test cobertura:cobertura -Dcobertura.report.format=xml"
                }, sonar: {
                    sh "mvn sonar:sonar -Dsonar.host.url=${env.SONARQUBE_HOST}"
                })
            }
            post {
                always {
                    junit '**/target/*-reports/TEST-*.xml'
                    step([$class: 'CoberturaPublisher', coberturaReportFile: 'target/site/cobertura/coverage.xml'])
                }
            }
        }
    }
}
That is it, you now have got a fully automated Jenkins docker image for this build pipeline with some important stages, next time I am going to show how to deploy maven project to artifact repository and that will involve some interesting steps including couple jenkins plugins and automation of plugin configuration as well.
Finally, if you were too lazy to follow the steps, you can just run the command below, it doesn’t require any setup apart form having docker installed:
git clone https://github.com/kenych/jenkins_docker_pipeline_tutorial1 && cd jenkins_docker_pipeline_tutorial1 && ./runall.sh
I hope you found this article useful.